Config+
Description
The SPORTident Config+ software enables you to read out and configure your SPORTident equipment. The SPORTident USB driver is necessary to communicate with a readout station connected via USB to your computer. Config+ provides functionality to read and modify the station, as well as any station put on top of this station and SI-Cards inserted into the station.
Installation
Please download the setup from the SPORTident website and run it to install Config+ on your computer. After starting Config+ for the first time, install the SPORTident USB driver from the Help menu.
As an alternative to installing Config+ on your computer, Config+ can also be used in portable mode. This will not leave any traces on the machine it is running on. To use portable mode, download the portable zip from the SPORTident website and extract it to a folder on your computer or, for example, to a USB flash drive. Start SPORTident.ConfigPlusPortable.exe to run the portable version of the application. Config+ requires .NET Framework 4.8 and must have write access to the directory it is running from.
Device connection
Direct mode
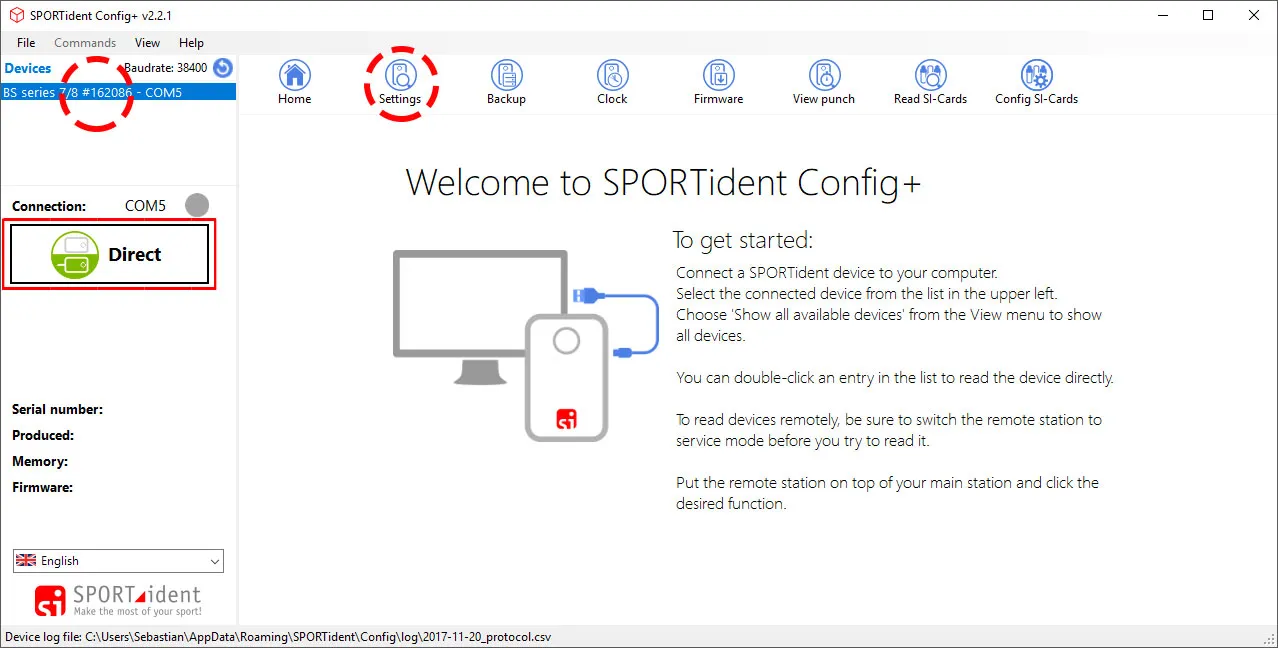
- Connect the readout station (e.g. BSM8-USB (miniReader) or BSM7-USB) to the PC.
- Start the Config+ software (the shortcut is usually on the desktop).
- If not selected already, click on the device you want to read.
- The button below connection needs to be on the position [Direct].
- Then click on [Settings]. The data of the station will be read and displayed.
Settings overview
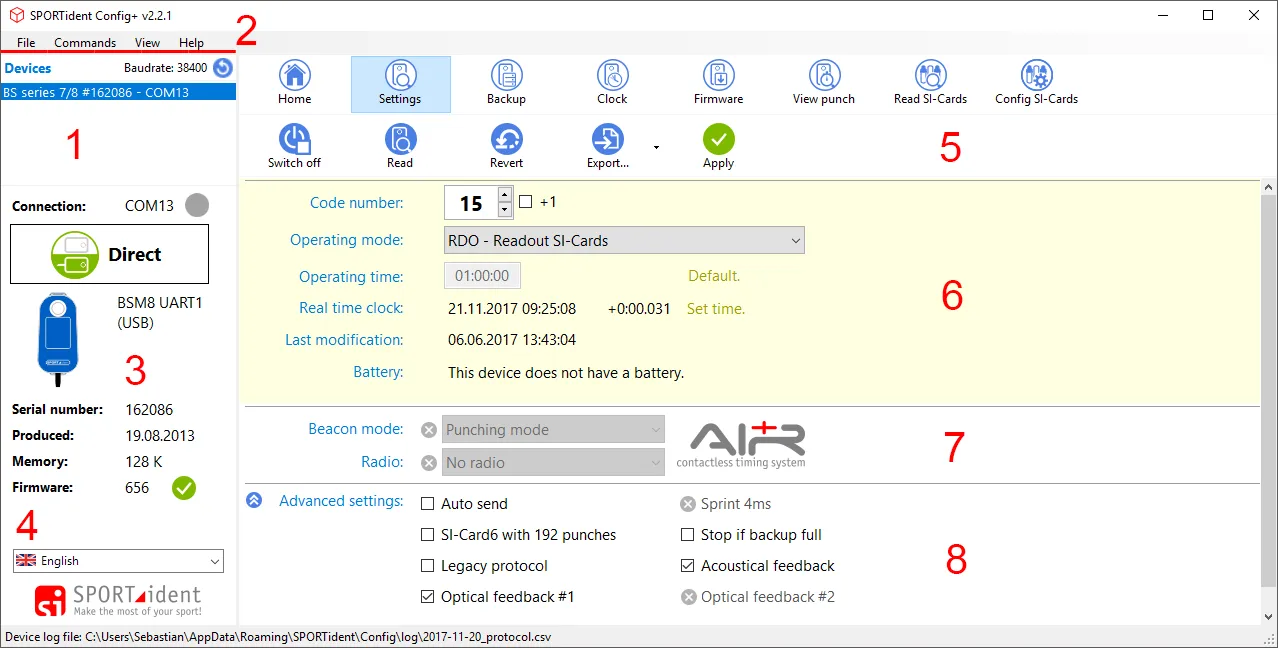
- The available device(s) and connection(s)
- The menu bar
- Information about the station and the installed firmware
- The language selector. By clicking it, another language can be selected
- The main toolbar
- Station’s basic settings area
- Station’s AIR+ settings area
- Station’s advanced settings area (can be shown/hidden by clicking the arrow left from [Advanced settings])
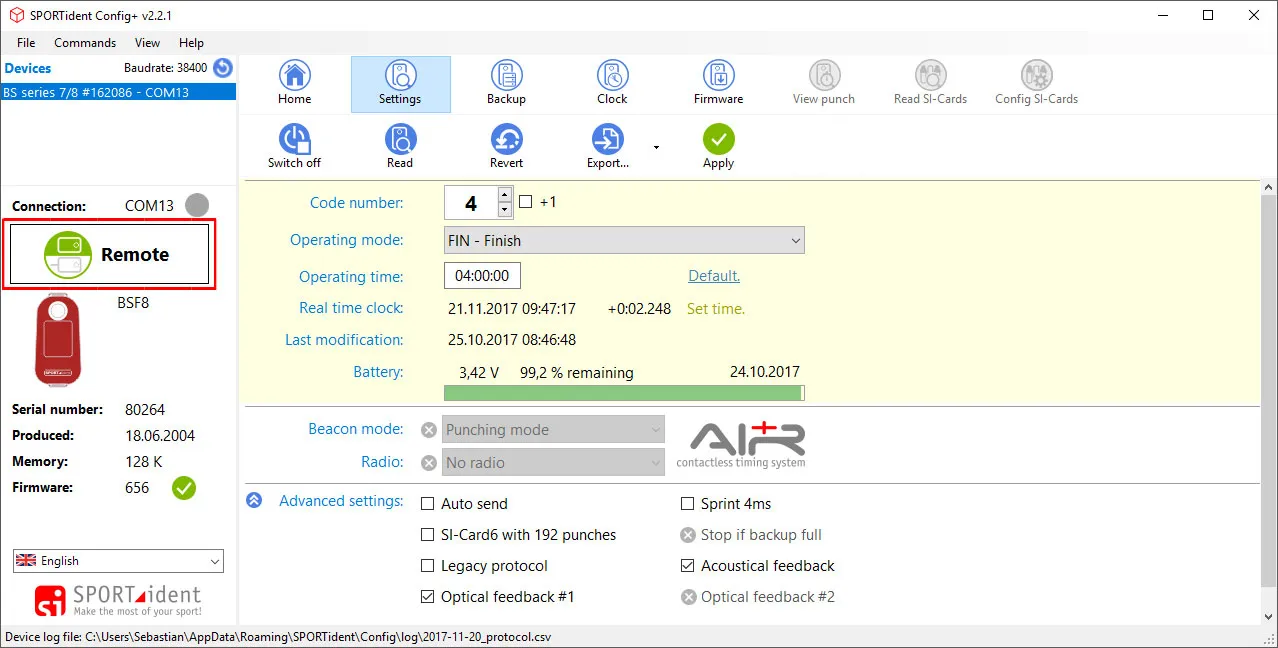
Remote mode
- Connect the main station (e.g. BSM8-USB or BSM7-USB) to the computer.
- Put the SI-Station you want to read out and/or configure in service mode. Place the Service/OFF instruction card ONCE in the station. On the LCD display SERVMO is visible (afterwards the other data of the station are shown).
- Start Config+.
- Put the coupling stick into the USB station and place the station (in service mode) on top of it (this station becomes the slave station).
- The [Direct] button needs to be toggled to [Remote]. If the button shows Direct click on it to toggle it. Click on [Settings] in the main toolbar. The data of the station will be read and displayed.
Basic configuration
Most SPORTident stations are technically identical and can be assigned any of the available functions. For the basic setup, these functions are CLEAR, CHECK, START, CONTROL and FINISH. The other possibilities will be explained with the AIR+ system.
A SPORTident-Card has allocated fields for the time of punching the stations CLEAR, CHECK, START and FINISH and a number of fields for the controls and the punching time.
| Operating mode | Functionality |
|---|---|
| CLR - CLEAR | Removes all data from the SI-Card and provides a feedback signal upon completion. |
| CHK - CHECK | Verifies that the SI-Card is empty and provides a feedback signal only if this is the case. |
| STA - START | Verifies that the SI-Card is empty and writes the start time on the SI-Card if this is the case. Provides a feedback signal if the start time has been written successfully. If the SI-Card is not empty, the old start time is not overwritten. If there are no controls punched yet, the start time is overwritten. |
| CN - CONTROL | Reads the competitor’s SI-Card and writes the control code and time on the SI-Card. The SI-Station then reads the SI-Card again to verify that it has been written correctly and then beeps and flashes and writes the SI-Card number and time into the station’s backup memory. If there are no data fields available anymore, the station will not write anything on the SI-Card (only in its backup memory) and will provide no feedback. |
| FIN - FINISH | Writes the finish time on the SI-Card (and overwrites a potential previous finish time, for example if somebody realized he/she had forgotten a control and went back) and confirms with a feedback signal. |
Configuration procedure
- Read the station in remote mode by clicking on [Settings].
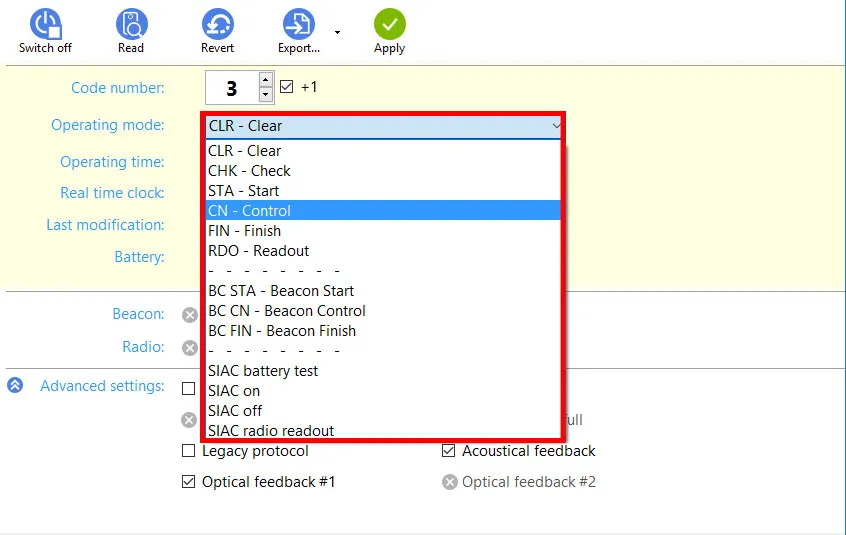
- Click on the field of the operating mode (below the control number). The different options are shown. Choose the desired function.
- To modify the control number, just change the code by clicking on the arrows (up or down) or type in the desired number. Control numbers 1 to 511 are allowed, but typically the control numbers start at 31 (see remark below). Important: Most of the PC software for orienteering and the SI-Card5 can only process numbers between 31 and 255.

- To confirm, simply click the [Apply] button in the main toolbar. A window with a progress bar will pop up and show the activity.

Switch off feature

If the [Switch off] button in the main toolbar is activated, the station will automatically go in standby mode when the [Apply] button is used.
Operating time
The SI-Station is always on and works in a low-power standby mode. There is no need to switch on the SI-Station or to make any special preparation before the unit can be used. In standby mode the SI-Station is fully qualified to receive SI-Cards. The wake-up time is at most 1 second.
In standby mode, the SI-Station is scanning for SI-Cards every second, in active mode the interval is 40 ms. The wake-up time is variable and depends on where in the 1 second cycle the SI-Card is inserted. Once the SI-Station is in active mode, the reaction time to the insertion of subsequent SI-Cards is very quick. The SI-Station then operates in active mode until the set operating time is reached. Any further punches reset that countdown. For example, the unit only switches back to standby mode 4 hours after the last punch if the 4 hours default setting for the operating time is used.
Change operating time
To modify the operating time in Config+:
- Read the station in remote mode by clicking on [Settings].
- To modify the operating time, change the HH:MM:SS time or click on [Default]. For the classic system, the default operating time of the stations is 4 hours. The minimum operating time is 2 minutes, the maximum operating time is 95 hours.

- To confirm the changes simply click the [Apply] button in the main toolbar.
Default settings
Every SPORTident station can be configured with default settings. These include code number, operating mode, and operating time. These settings are stored non-volatile in the system memory of the station. The default settings can be easily restored. This helps to quickly reset a set of stations to the owner’s default settings after the stations have been used in another, larger kit to serve in another application.
After enabling this feature in Config+ (menu View > Show ‘apply as default’ buttons) the [Apply default] and [Restore] buttons are available.

The [Apply default] button allows you to apply the setting to the device and make these settings as defaults.
To restore the default settings, press the [Restore] button. You can also use an SI-Master station in Standard master (STD MA) mode (see section SI-Master additional features).
Time synchronisation
All stations have an internal clock and their ‘real time’ has to be monitored. The station’s real time clock system is calibrated and temperature compensated. This offers high accuracy also at very high and very low temperatures. The internal time resolution is approximately 4 ms and the deviation about 4 seconds per week for BS7/8/9 and 1 second per week for BS11.
It is vital that all stations and especially the start and finish stations are time synchronised before a race. That can be achieved by Config+ or by using the SI-Master station. If you use a SI-Master station for time synchronisation, you do not need a computer, except to synchronise the SI-Master itself to computer time. The SI-Master station can transmit the time directly to the other stations.
The time of a SPORTident station will be set automatically when:
- you are booting the firmware of a SI-Station
- you are changing the configuration of a SI-Station
Synchronisation with SI-Master
-
Put the SI-Master station on top of the USB station and read remote by clicking on [Settings].
-
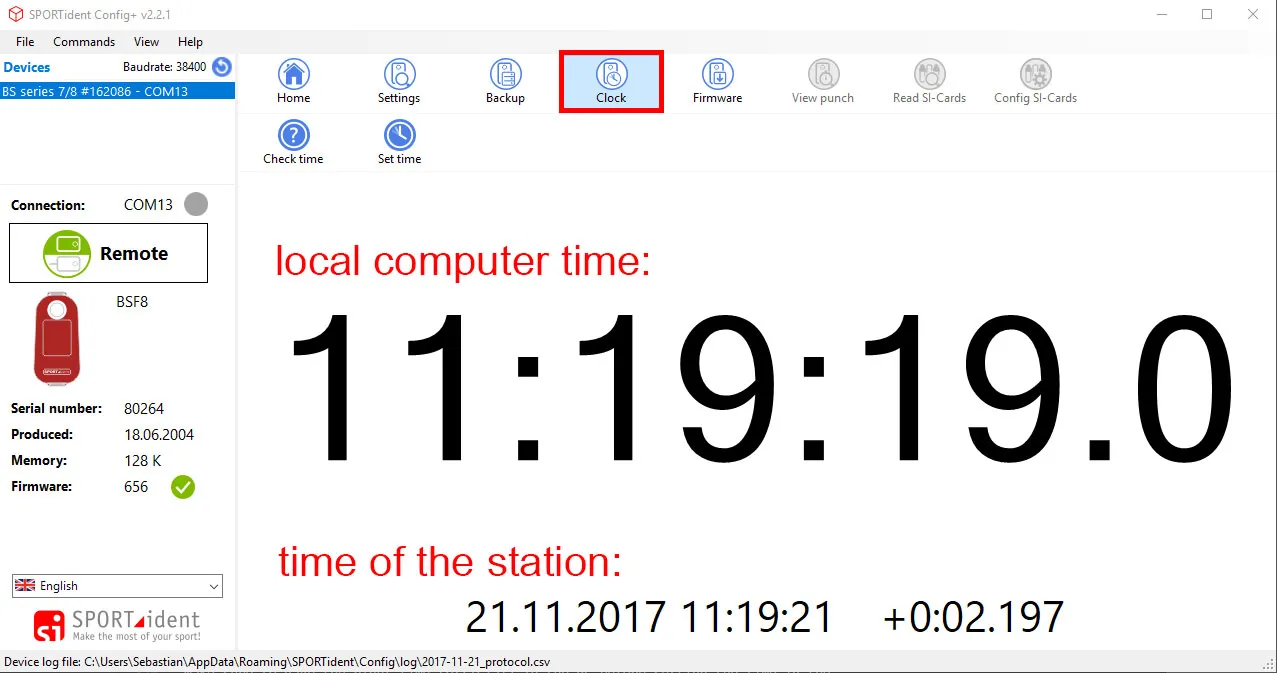
Click on [Clock]. Computer time (in big) and the station’s time will be shown.
-
Click on [Set time] and the time of the station is modified to match the computer time. [Check time] allows you to verify this afterwards.
-
Remove the SI-Master from the main station.
-
Put the Service/OFF instruction card twice (with a very short time interval) in the SI-Master. On the front side of the SI-Master there is a small LCD display. On this screen TIMEMA must be shown. When you see this, the station is ready.
-
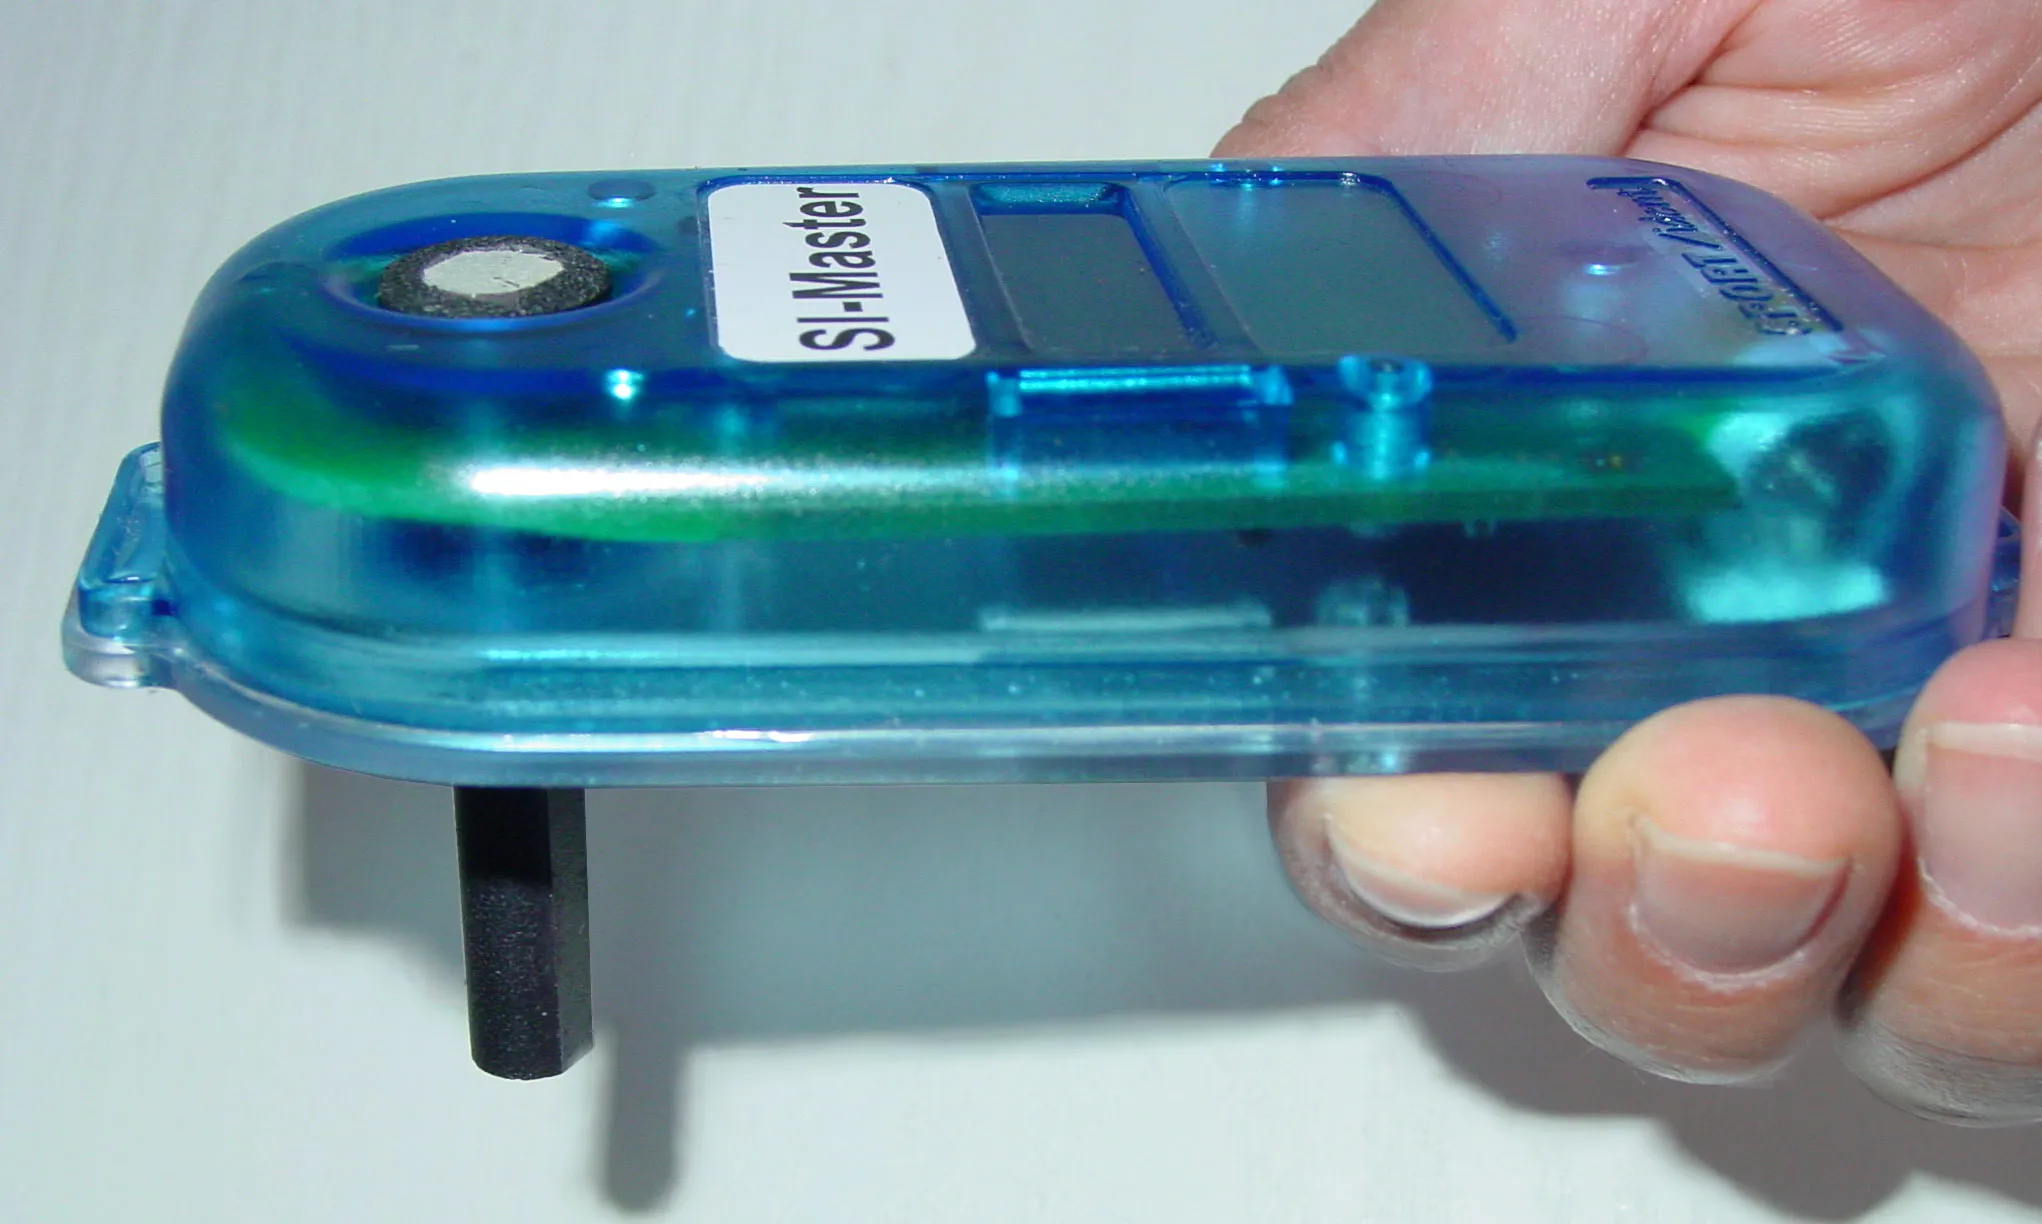
Put the coupling stick in the SI-Master.
-
Place the Service/OFF instruction card ONCE in the station you want to synchronise. On the LCD display SERVMO is visible (afterwards the other data of the station are shown).
-
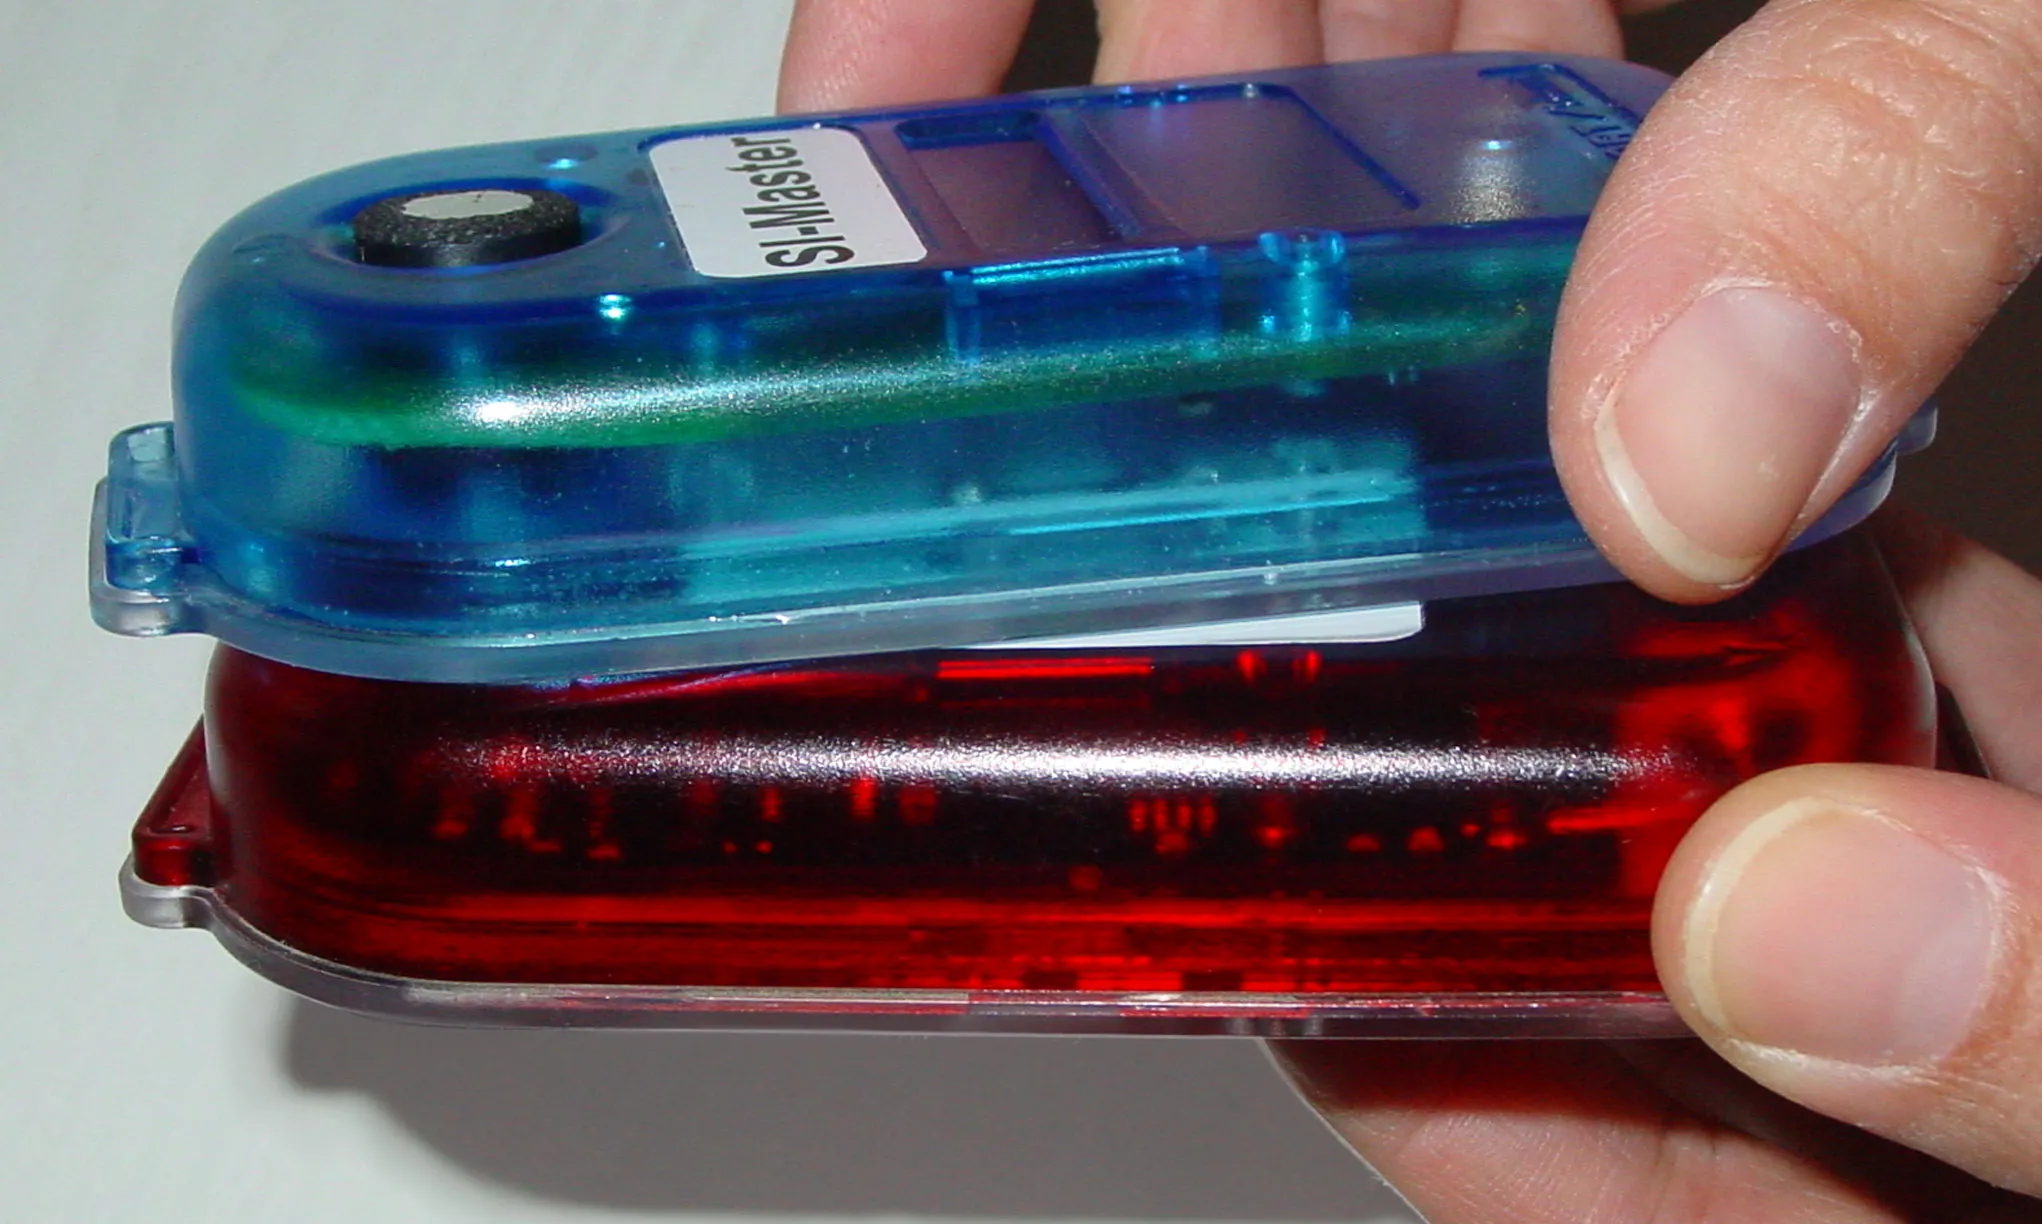
Place the station on the coupling stick and the SI-Master. After some seconds there is a ‘beep’. The time of the station is now adjusted.
-
Place the Service/OFF instruction card into the station until the LCD display is empty. The station is now back in standby mode (it would automatically switch into standby mode after 5 minutes).
SI-Master additional features
The SI-Master station works both as a ‘Time Master’ and as a normal SI-Station, for example as a clear station. This means that there are two functions in one unit. The SI-Master is an extended control station. It works and can be configured the same way as any other SI-Station. Each action by an ordinary SI-Card immediately activates the station’s base mode. All functionalities of the regular SI-Stations are available. When punching a SI-Master station in standby mode with the Service/OFF instruction card, it will cycle between the following modes:
Service mode (SERVMO)
Displays the most important settings, switches back to standby mode after 5 minutes.
Time master (TIMEMA)
The station will synchronise and set the time of every coupled SI-Station (see section Synchronisation with SI-Master).
Extended master (EXT MA)
The station will not only synchronise and set the time of every coupled SI-Station but also change the operating time to the one of SI-Master station (see section Operating time) and clear the backup memory of the coupled station (see section Read backup). With these 3 actions executed at the same time, an organiser can save significant time when preparing the stations for a race.
The SI-Master station writes into its backup memory when it synchronised which station (serial number).
Standard master (STD MA)
The station will synchronise and set the time of every coupled SI-Station and restore the default settings for the station that has been set up in advance using Config+ and clear the backup memory of the coupled station. This is an ideal solution for stations frequently used by different persons. See section Default settings to learn how to set default settings with Config+.
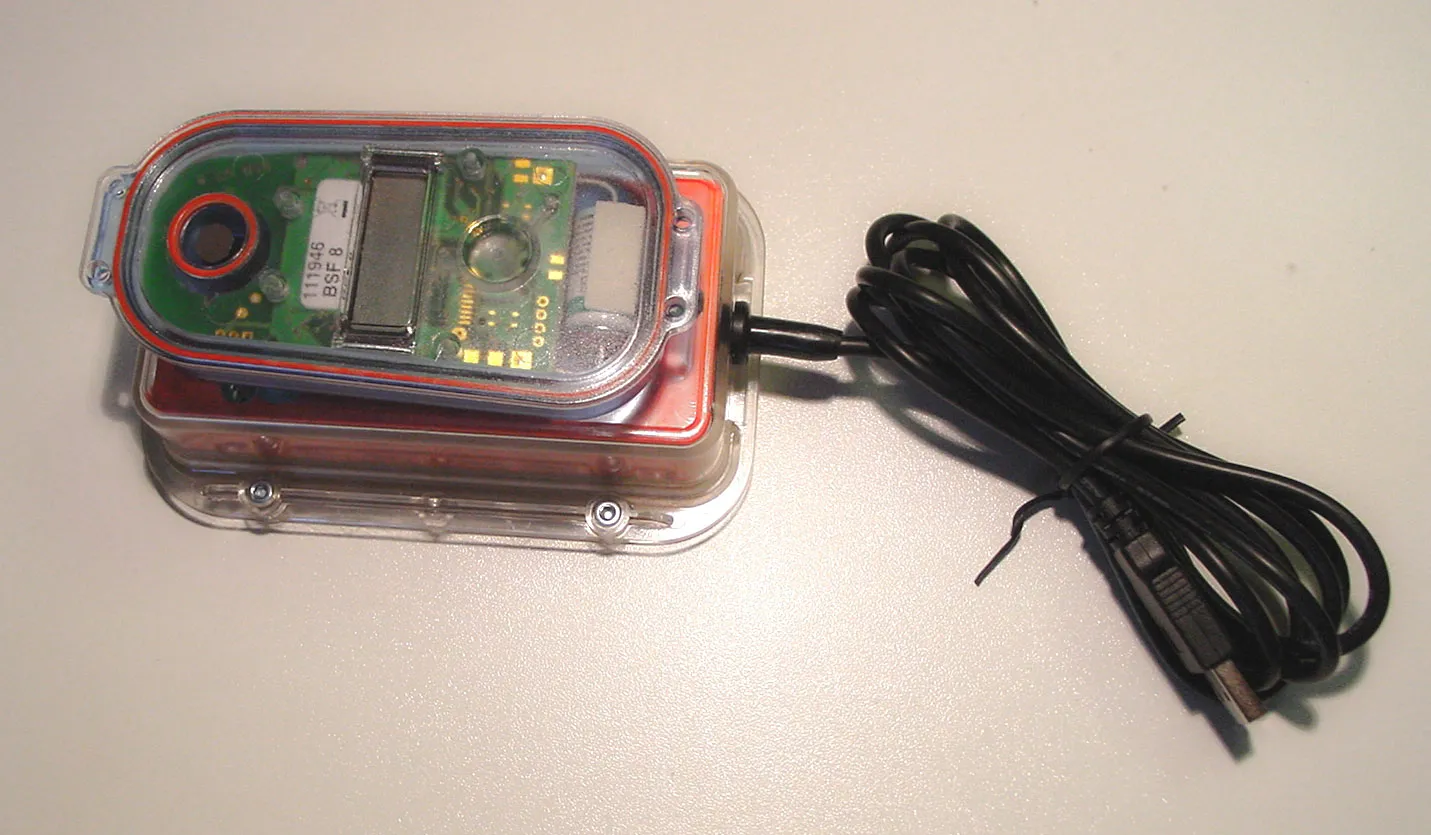
Battery status
A lithium battery is soldered to the printed circuit board (size 1/2 AA in the BSF8/9 station, AA in the BSF7 station). The double size of the battery of the BSF7 stations provides an extended life time to the stations before battery replacement is required (4 to 7 years for the BSF7 stations against 3 to 5 years for the BSF8/9 stations). The listed life time is of course an average, and depends basically on the frequency of use of the stations, the number of participants and the use of AIR+.
The voltage of all stations should be checked (at least twice a year) to make sure that the batteries are OK. Check the voltage with Config+ or via the display of the station in service mode. For more information, see section LCD display information.
- Read the station in remote mode by clicking on [Settings].
- The condition of the battery is indicated on the screen in the stations setting area. A colour code for the battery voltage indicates the battery condition:
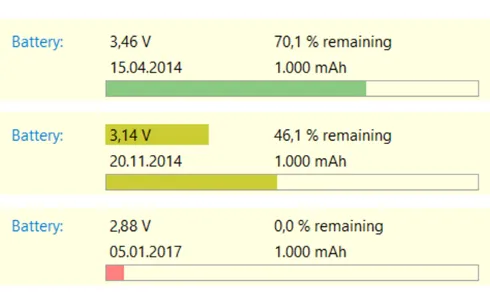
- Green: A voltage of 3.2 Volts and higher is considered safe.
- Yellow: A voltage between 3.2 and 3.0 Volts is considered to be intermediate. The station might still be able to work for another event.
- Red: A voltage below 3.0 Volts is considered low. The station will beep 6 times with short intervals when it is switched to active mode. The station will also show a battery low indicator in the display. You should change the battery as soon as possible.
To have an idea of the age of the battery, the date of installation of the battery is also displayed.
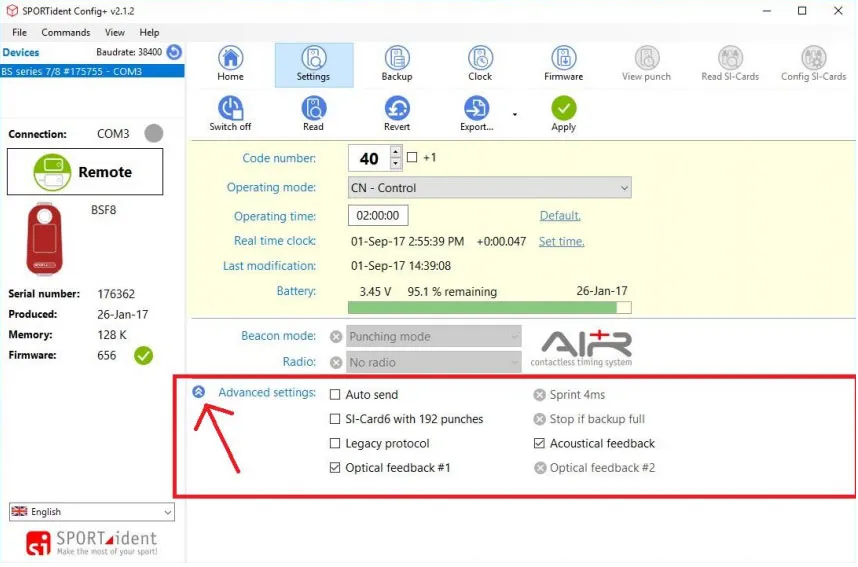
Advanced settings
By clicking on the arrow next to Advanced settings, additional configuration options will be displayed. Depending on the configuration of the station, different options will be available. The picture below shows the options for a normal control station.
Auto send
Basically, ‘Auto send’ can be enabled for cabled stations with all operating modes. For stations without cable ‘Auto send’ only makes sense for the BSF8-SRR or for the operating mode Readout. This causes the station to automatically read the card contents and store it in its backup memory. Later this backup memory of the station can be read to retrieve all card data. This is a useful feature to create backup data for the read SI-Cards.
SI-Card6 with 192 punches
The (old) SI-Card6 checkbox means that the stations will continue to write data on a SI-Card6 which will be able to store up to 192 punches.
Legacy protocol
It is recommended not to activate this setting except for the use with old event software that does not support the new protocol.
Optical feedback
With this option enabled the LED of a station will blink when punched. Checked is the default setting.
Acoustical feedback
With this option checked, the station will emit a beep when punched. It can be useful to uncheck this box for night orienteering or special adventure races or raids. Checked is the default setting.
Sprint 4ms
This option is only available with the start and finish stations. If this option is enabled, the SI-Station will write the time with 4 ms resolution instead of seconds resolution. Please note that the event software must support this feature, otherwise it makes no sense to check this box. This feature is especially useful in competitions where a race time is needed with a precision of 0.1 sec.
Stop if backup is full
This option is only available for the readout station. If this option is enabled, the station in operating mode Readout SI-Cards with ‘auto send’ enabled will turn off when the backup memory is full. This ensures that old backup memory will not be overwritten (as is the default case). This is useful if you are required to have a full backup set of read SI-Cards and old records should not be overwritten. The station will stop reading to prevent data loss. This will enable the operator to switch stations.
Flip display
This option is only available for the BS11 stations. It will rotate the display information by 180°.
Read backup
Every direct punch of a SI-Card is stored in the SI-Station’s backup memory. Config+ can be used to read the backup memory. The data can then be inspected to check if a runner punched and if it was correctly done. The backup memory can hold up to 21802 punches or 1022 SI-Card data records. When full, the oldest data is overwritten. The operating mode of the station defines the backup memory format.
It should be noted that even if a control is not recorded on the SI-Card, the SI-Card is most probably registered in the backup memory of the control station with an error code. It is almost impossible to insert a SI-Card into a station without the SI-Station having the time to read and record the number of the SI-Card. Error codes are given as ErrA to ErrF, depending on the moment of the interruption of the writing process.
| Code | Description |
|---|---|
| Err8 | The pointer is destroyed. The reconstruction was done automatically. |
| Err9 | The SI-Card used is already full and no further data will be saved. |
| ErrA | The SI-Card was removed from the station too fast. Only the card number was read. |
| ErrB | Error during sending the station’s code number to the SI-Card. |
| ErrC | Error during reading the SI-Card to confirm that the code has been stored. |
| ErrD | Error during re-reading the SI-Card for verification. |
| ErrE | The SI-Card was not cleared. |
| ErrF | The SI-Card does not support the code number of the station. |
The handling of complaints in orienteering about missing controls (see § 20 and appendix 4 of the IOF competition rules). If the competitor did not wait for the feedback signal when punching, there will be no punch record on the SI-Card. However, the punch will be stored in the station’s backup memory with an error code.
It is possible to download the punches from that control and search for this punch using the SI-Card number. Two cases are possible:
- There is a punch record with an error code. An error code proves that the runner did not wait for the signal. This means that he does not have a valid punch from that control.
- There is no punch record found. Then the runner did not punch at all at this control.
However, the IOF orienteering rules and almost all national competition rules strictly stick to what data is found on the chip and they do not allow for any evaluation by downloading punches from controls unless it can be established with certainty that the missing or unidentifiable punch is not due to the competitor’s fault.
Read backup procedure
- In remote or direct mode, click the [Backup] button in the main toolbar.
- A progress bar will show the activity.
- A list of punches with SI-Card number and date/time will be available when there is some data in the backup memory. Otherwise the list will be empty.
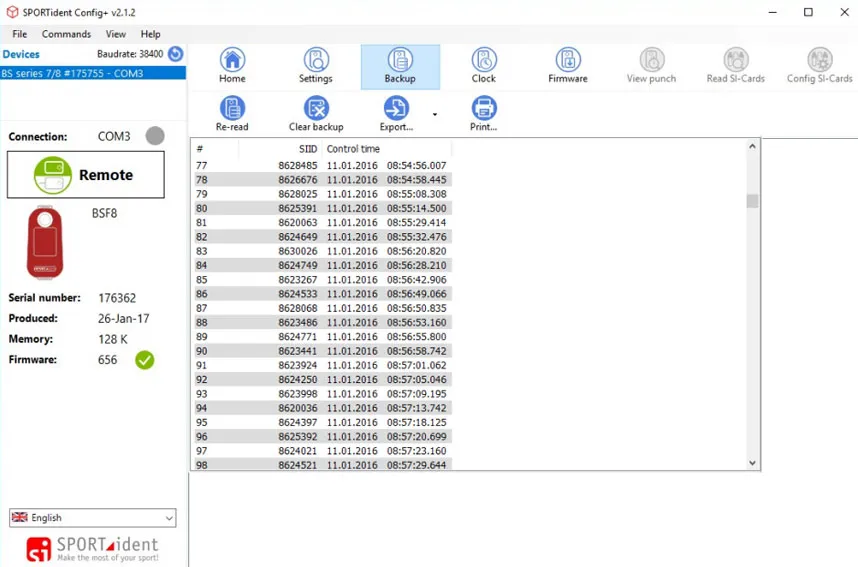
It is possible to search for a specific SI-Card by scrolling the list, to export the file (raw format or CSV format) or to print the list. If an error occurred during the punching process, the time will be replaced by the error code. It is easy to identify these errors on the screen as they are highlighted in red.
Firmware update
SPORTident frequently updates the firmware of its devices. Firmware updates include new features and fix issues. New firmware is available through the firmware update features of SPORTident Config+. This software will frequently check for new firmware versions. You can also manually check for updates (menu Help). If a new firmware version has been found and is ready to be installed, an information dialog will be shown:
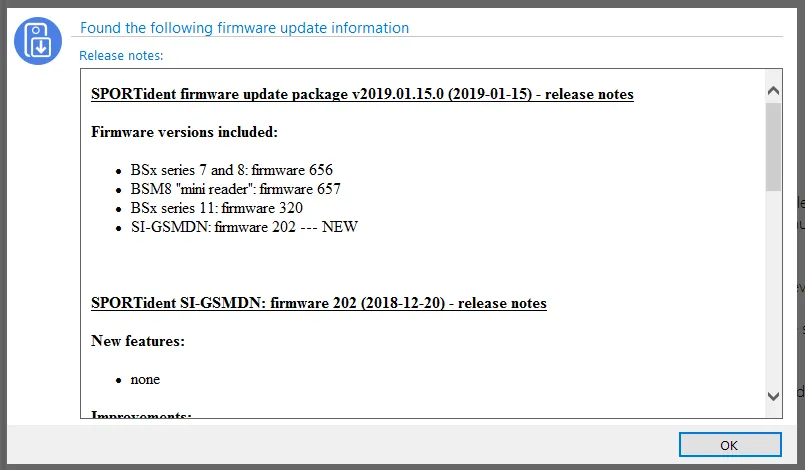
To check if you need to update your station to the new firmware, read the target device with Config+. The left view will indicate the firmware version. The yellow icon will tell you that your firmware is not up to date. A green icon will indicate that the firmware is up to date.

How to perform the update
- In Config+, read the settings of the device you want to update. Read Remote if you want to update a slaved station or Direct if you want to update a station being connected via USB.
- Open the firmware update view by clicking the [Firmware] button in the main toolbar.
- The firmware update view will show which firmware is available for your device:
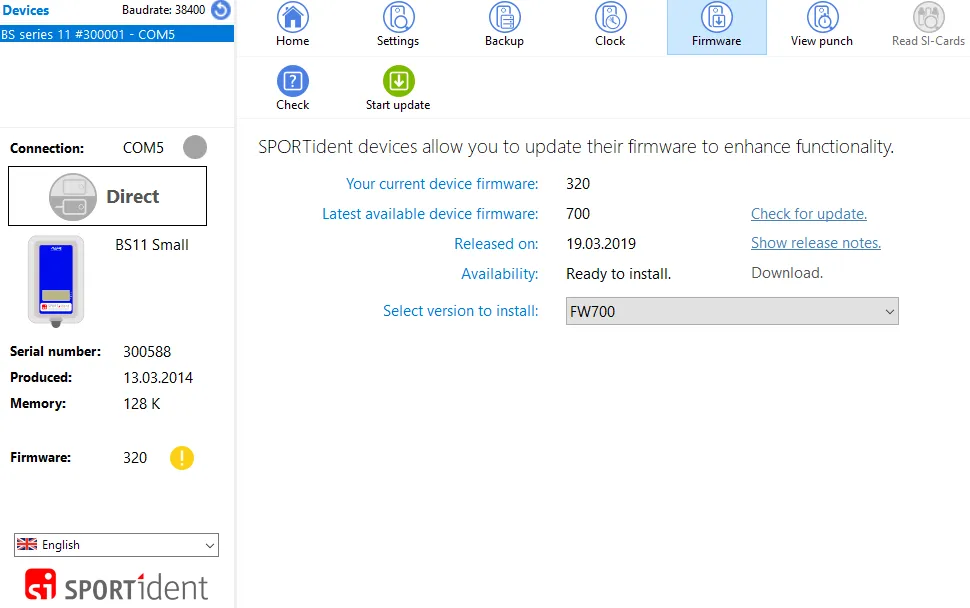
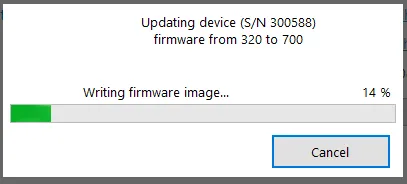
- Click [Start update] to start the firmware update process. The device settings will be verified and Config+ will ask you to confirm the firmware update. Click Yes in the upcoming dialog.

- If you update a slaved station, keep it steady on the main station.
- Wait for the process to complete. The coloured indicator shows the transmission quality of the firmware image. You can improve it by using a coupling stick if it turns yellow or even red.
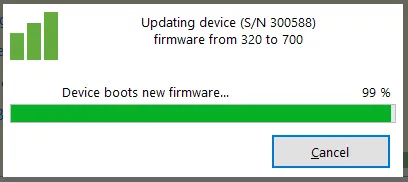
- When the update process has completed, you will see a message telling you that the update was successful.
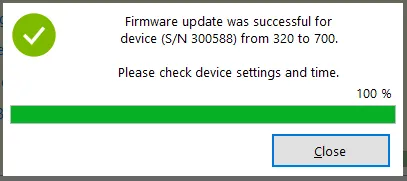
- Done. You can now disconnect and switch off the device.
Read SI-Cards
With Config+ it is possible to show the raw data of a SI-Card and export it in different ways.
In direct mode, click on [Read SI-Cards]. The card will be read automatically when inserted in the main station. A progress bar will pop up.
All data on the card will be shown: on top the time of clear, check, start and finish, followed by the different punches and at the bottom the personal data of the runner.
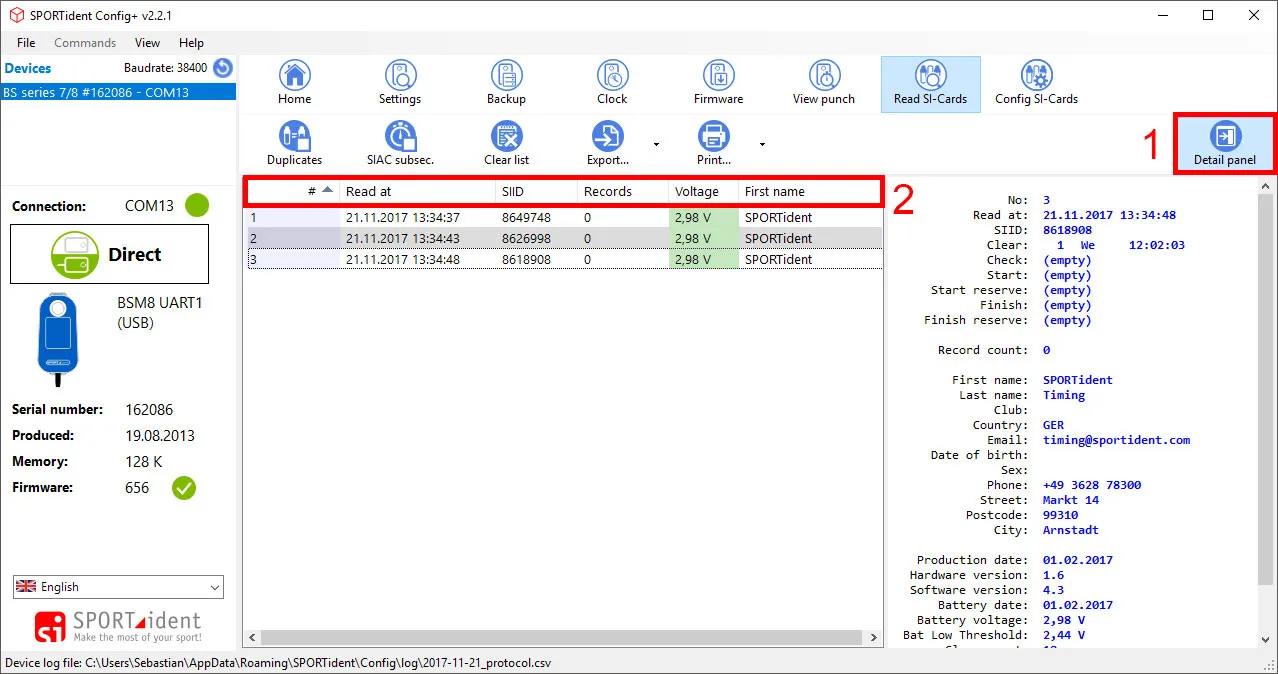
Clicking on the [Detail panel] button will hide the data on the card.
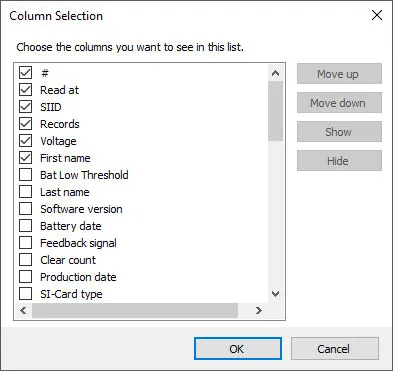
By clicking the header with the right mouse button, you can select the columns you like to display in the table. You can load and save your selection by clicking the right mouse button in the readout table.
Read SI-Cards navigation bar
By activating the [Duplicates] button, a SI-Card can be read more than once in the list. If this option is not checked, the card will not be read again if it is already listed.
By activating the [SIAC subseconds] button, SIACs punching sub seconds are read from the SIAC’s memory. Every contactless punch with a SIAC at a station in beacon mode will be registered with sub seconds. However, not every timing software can process this data.

[Clear list] will delete all readouts of the last session. If the cards are not cleared, all data is still stored in the cards. By right clicking a row in the table of a card readout, single cards can be deleted.

By clicking the [Export] button in the main bar, a sub navigation will open. Here you could export the current view of your readout list or a file with all card information (full detail view). By right clicking a row in the table of a card readout, single cards can be exported.

By clicking the [Print] button in the main bar a sub navigation will open. Here you can print single card details or the complete list. To print just one card, a row in the table needs to be selected.
Config SI-Cards
- In direct mode, click on [Config SI-Cards]. Insert the SI-Card in the main station. The SI-Card will be read automatically if the [Auto Read] checkbox is on. Otherwise, click on the [Read] button and the SI-Card will be read.
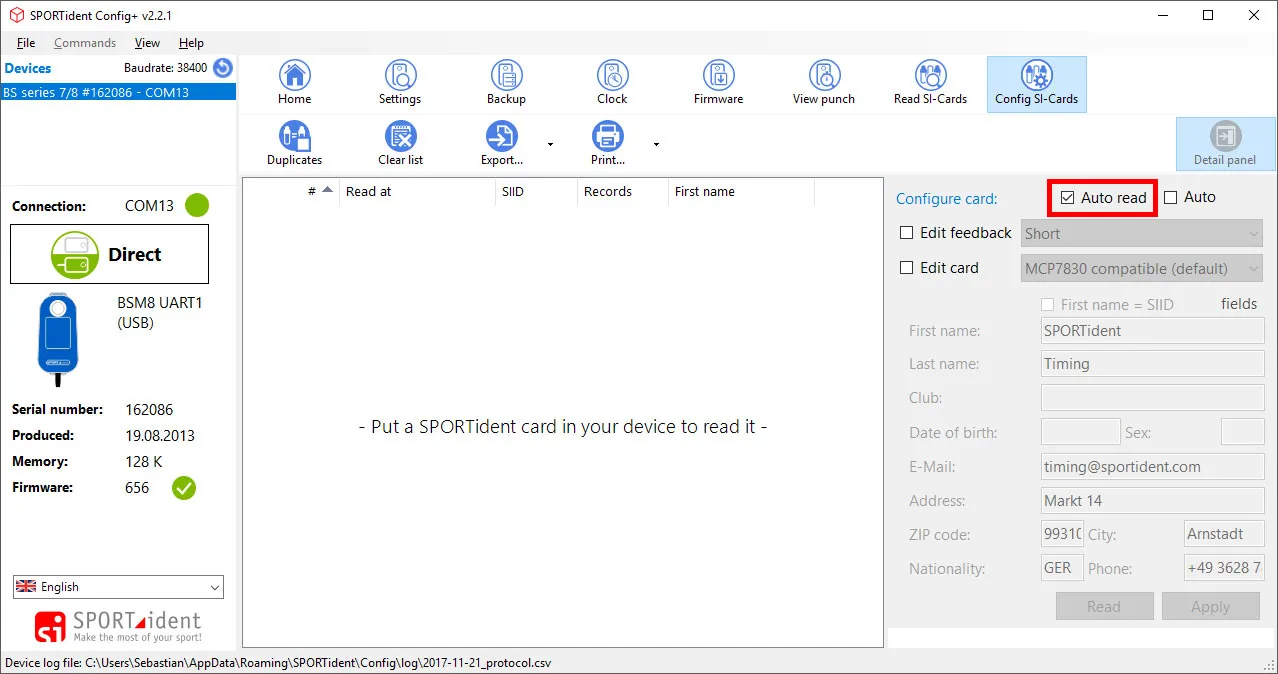
- Click in the checkbox next to [Edit card personal data] and the fields where information can be written become active. The number of fields varies with the type of SI-Card from none (SI-Card5), first name and last name (SI-Card8 and 9) to everything (SI-Card6, 10, 11, pCard and SIAC).
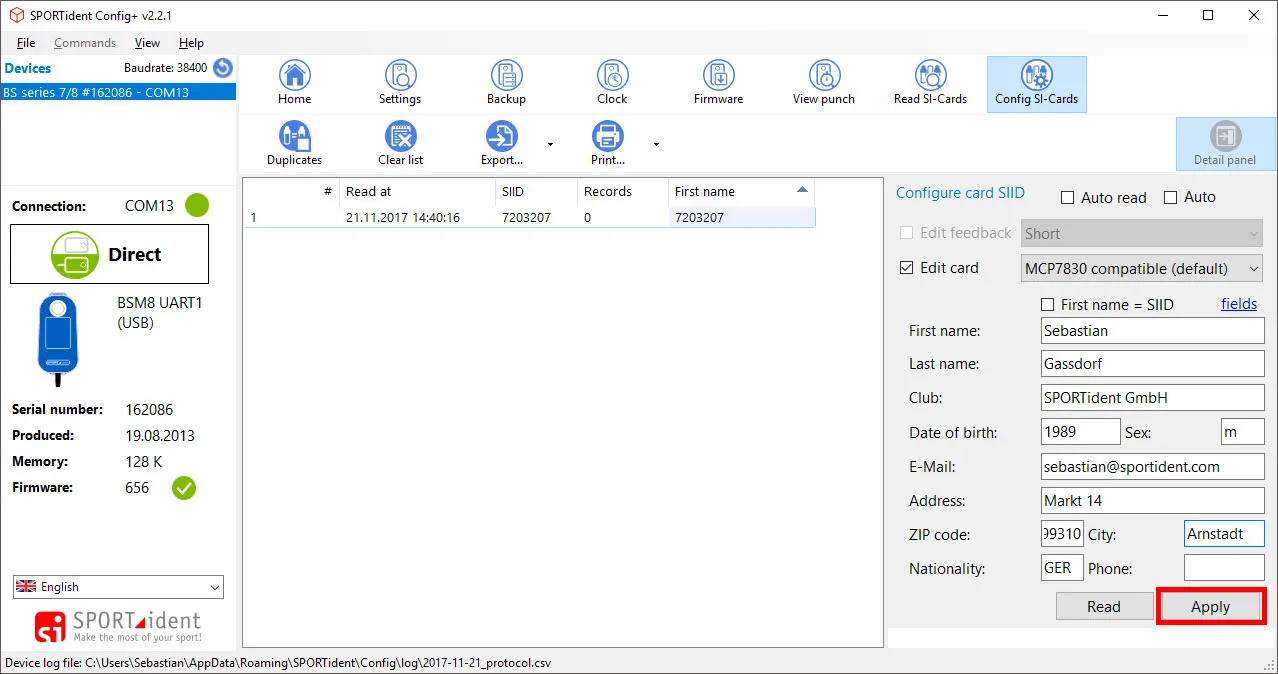
- When finished, click on [Apply]. This button is only available if the SI-Card is in the main station.
- For the SI-Card11 and the SIAC, the feedback signal can be configured. During the time that the SI-Card is flashing (and beeping), a subsequent punch cannot be recorded. This means that with long feedback periods, these SI-Cards are not suitable for some activities such as rapidly punching all the boxes on a table to check if they are working.
 Check the checkbox [Edit Feedback signal] and click in the field that becomes active. The default feedback (about 3 seconds duration) is best for the requirements of typical orienteering events. In general, it is recommended to use the long feedback cycle (about 5 seconds duration) for applications in Ski-O and MTB-O and the short feedback cycle (less than 1 second duration) for most non-orienteering events where competitors will not closely monitor the card feedback. The option [Blink only] (about 4 seconds duration) is available for the SIAC only as the SI-Card11 is not emitting a sound signal as feedback.