SPORTident Printer
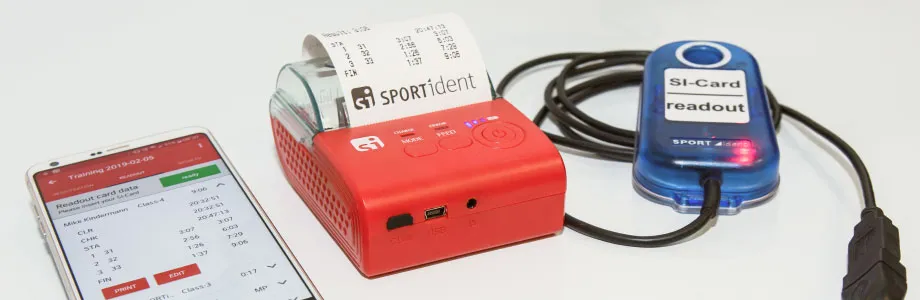
SPORTident Printer (Art.-No. 14123) is a pocket-sized, light-weight and battery-powered thermal printer. The printer is designed to be used with the SPORTident Orienteering App. The SPORTident Orienteering App Set (Art.-No. 15000) contains the SPORTident Orienteering App for Android, the SPORTident Printer with accessories and a SPORTident mini reader for a fully functional evaluation kit for trainings and small events. You will be able to read and evaluate competitors’ SI-Cards right on site without the need for an external power supply or other accessories.
The SPORTident Printer allows you to connect via Bluetooth, USB or serial port connector. This gives you the flexibility to use both existing legacy equipment as well as the latest tools like the SPORTident Orienteering App.
Specification
- Direct thermal printer
- 58 mm paper width
- Up to 70 mm per second printing speed
- Expected life of thermal printing head: 100 km
- Resolution: 203 DPI (8 dot / mm)
- Paper roll diameter: ≤ 40 mm
- Power: rechargeable lithium battery
- Battery: 7.4 V DC, 1500 mAh
- Power supply: 9V DC, 1.5 A
- Interfaces: Standard RS232 (Mini-USB jack), USB 2.0 (Mini-USB jack), Bluetooth 2.0 & 4.0
- Serial port (RS232) settings: 4800 baud, 8, n, 1, no flow control
- Working environment: -10 to 50 °C, Humidity: 10 to 90 %
Safety points
- The printer has a lithium-ion battery. Only use the original battery and charge it with the supplied charger.
- Do not put the printer and the battery in fire or water. This may cause an explosion.
- Do not dispose of the batteries in domestic waste, but return them to SPORTident, the trade or your local waste disposal company.
- Do not open the paper cover while printing and for a short time afterwards. The print head is hot after printing!
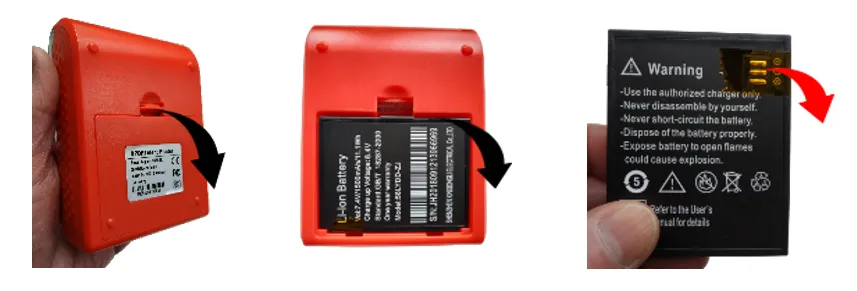
First use and charging
The SPORTident Printer is shipped in a paper box together with a power adapter, a Mini-USB cable and a paper roll. For first use, please unpack the printer from the plastic foil and open the back cover. The lithium-ion battery is taped for transportation safety. Remove the insulation tape from the battery, insert the battery again and close the lid.
Connect the supplied charger and charge the battery until the CHARGING indicator shines blue. The BATTERY indicator will indicate the battery level in three steps.
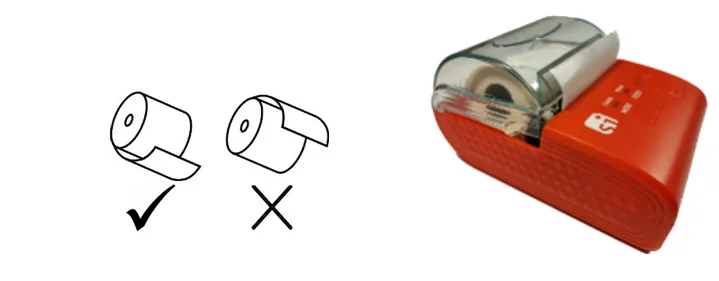
Replacing the paper roll
The printer can be used with 58mm wide thermal paper. The maximum length of the paper roll is 25m. Open the paper tray by lifting up the clear plastic lid. Put the paper roll into the paper tray so the paper protrudes. Note the orientation of the paper roll as shown:
Operation
To switch on the printer, keep the [POWER] button pressed for three seconds. The BATTERY indicator will blink blue. Now the printer is ready to be used.
Press the [FEED] button to manually feed the paper. The [MODE] button is not needed for normal operation.
To switch off the printer, keep the [POWER] button pressed for three seconds. The BATTERY indicator should turn off.
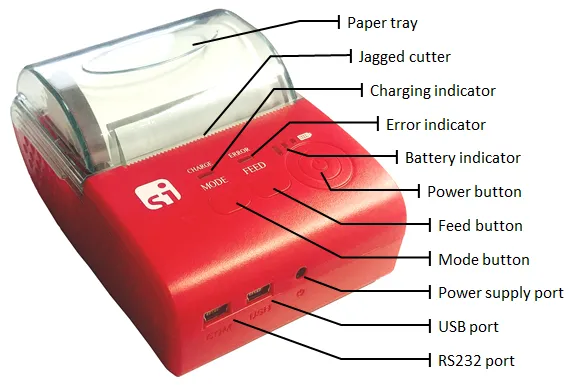
Status LED
The printer incorporates three LED indicators to report its condition.
| LED Indication | Condition | Description |
|---|---|---|
| CHARGING | Shines red | Charging in progress |
| CHARGING | Shines blue | Charging completed |
| ERROR | Blinks red | Paper out or stuck |
| BATTERY | Blinks blue | Printer on, shows the battery level in three steps, Bluetooth not connected |
| BATTERY | Shines blue | Printer on, shows the battery level in three steps, Bluetooth connected |
Using SPORTident Printer with the Orienteering App
The SPORTident Printer is designed to be used with the SPORTident Orienteering App. The printer connects via Bluetooth to an Android smartphone.
To connect the SPORTident Printer for the first time:
- Turn on the printer.
- Turn on Bluetooth on your phone.
- Search for available Bluetooth devices on your phone. The printer should be visible as “SI-Printer xxxxx” where xxxxx is the serial number noted on the package or on the back side of the printer.
- Connect the printer to your phone. If the printer asks for a Bluetooth PIN, the PIN is 5349.
- Set up the printer in the SPORTident Orienteering App. Go to Settings > Printer and choose the coupled printer. You can do a test print to verify the connection.
Now you can print results on the SPORTident Printer with the SPORTident Orienteering App.
Video: SPORTident Orienteering App. The app for your orienteering training.

Using SPORTident Printer with the SPORTident Printout Station BS7-P (Art.-No. 13200)
The SPORTident Printer features a “COM” (RS232) connector that is hidden under a rubber cover on the front panel of the printer - the left socket is labelled with COM. Although the jack type is Mini-USB, it is a serial port.
SPORTident supplies a special adapter cable called “SPORTident Printer Serial Cable” (Art.-No. 15032) to connect your legacy Printout Station to the printer. This article needs to be ordered separately.
Remove the rubber cover from the “COM” jack of the printer. Connect the SPORTident Printer Serial Cable to the “COM” jack on one side and the SUB-D connector to the Printout Station on the other side.
Update the layout for SPORTident Printout Station
If you intend to use your legacy SPORTident Printout Station with the new SPORTident Printer, you need to adapt the layout that is stored in the Printout Station, as the new printer’s paper width is a bit smaller than before. This can be done in the following two ways.
Update the layout in a Printout Station directly
It is recommended to fix the layout in the layout file that is stored on your computer. However, if the original layout file is not available anymore, you can fix the layout directly in your Printout Station.
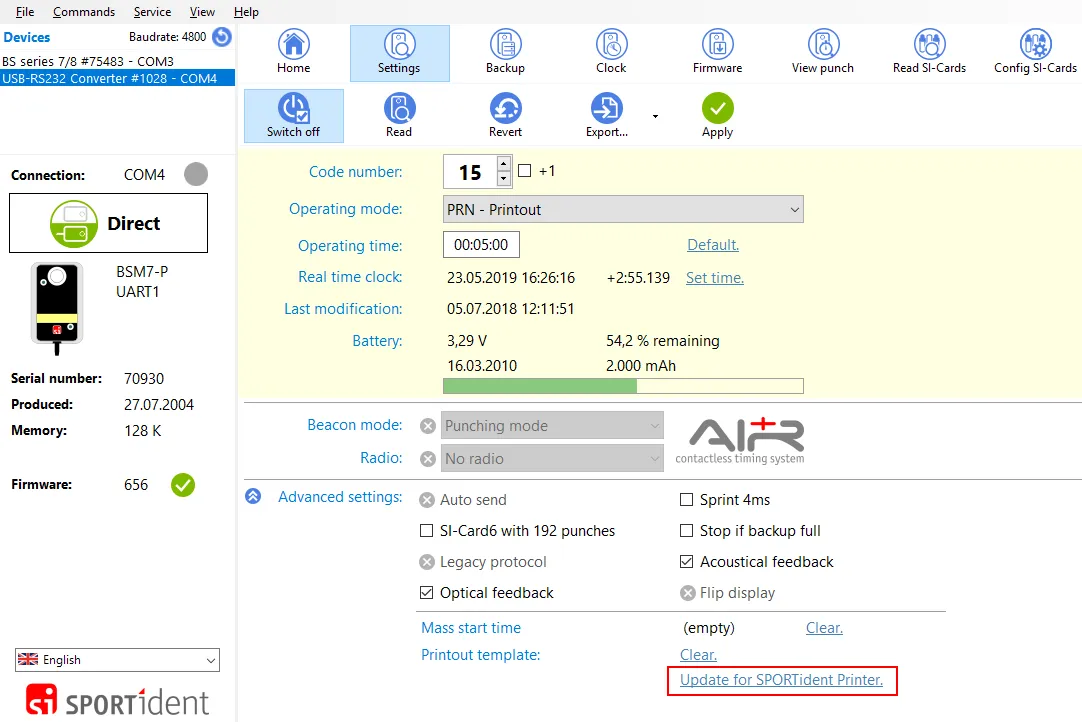
- Open Config+, connect and read your Printout Station.
- In the settings view, open the Advanced settings panel.
- You will see a link label called ‘Update for SPORTident Printer’.
- Click this label and confirm the question.
- Config+ should start working and report success after several seconds.
- Optional: Connect the Printout Station to the SPORTident Printer and do a test print with any SI-Card.
Update a layout file that is stored on your computer
- Open Config+. You do not need to have a SPORTident Station connected to your computer.
- In the menu, go to Commands > SPORTident Printer > Update print layout in XML file….
- You will be asked to select the layout file on your computer.
- Config+ will confirm that the layout file has been updated.
- Load the layout file to the Printout Station using SI-Print.

Using SPORTident Printer with your computer
SPORTident Printer features a Mini-USB jack labelled “USB”. You can use a standard Mini-USB to USB-A cable (included in the package) to connect the printer to your computer.
SPORTident Printer maintenance and troubleshooting
Cleaning the printer
The printer housing can be cleaned with a moist soft cloth.
Cleaning the printer head
When the printer has the following conditions, you should clean the printer head:
- The printer does not print clearly but the thermal paper looks ok.
- The printer is noisy while feeding paper or printing.
To clean the printer head:
- Power off the printer and open the paper lid. Remove the thermal paper roll.
- If the printer just finished printing, please wait for the printer head to cool down.
- With a soft cloth dipped in cleaning alcohol (not dripping!), wipe the thermal printer head gently and remove any dust or stains.
- Wait for the alcohol to dry completely, then place the thermal paper roll back, close the printer, reconnect power or battery and print a test page.
Printing a test page
To print a test page with all printer settings, do the following:
- Power off the printer.
- Be sure to have at least 60 cm of paper inserted.
- Hold down the [FEED] and the [POWER] button for 2 seconds.
- Release both buttons. The ERROR led will shine red, the BATTERY indicator will shine blue.
- The printer prints a test page.
Default settings
The following scan shows the default settings that can be verified with a test page:
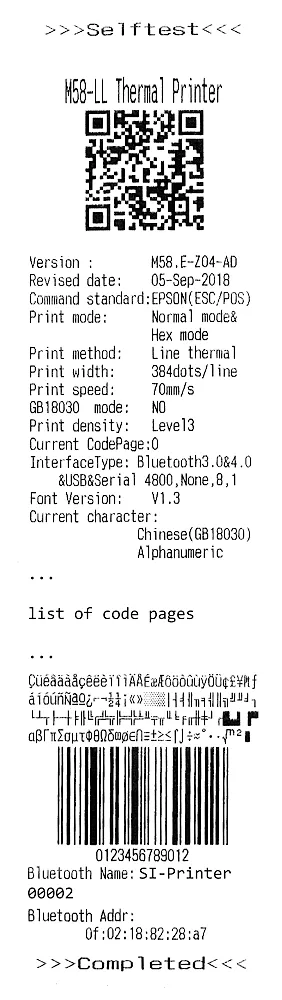
Common problems with the printer settings
Problem: The printer prints Chinese characters on the test page or on any other printout.
Solution: The printer has probably switched to Chinese character mode.
Print a test page and check the line GB18030 mode. If this setting says YES, do the following:
- Power off the printer.
- Hold down the [FEED] and the [POWER].
- The ERROR led with shine red, also the BATTERY indicator with shine blue.
- Keep both buttons pressed until the ERROR led turns off. Now release the [POWER] button but leave the [FEED] button pressed.
- The printer should print “You select ASCII Mode”.
- Verify the correct setting by printing a test page again.
Problem: The printout is patchy and hard to read.
Solution: First change to another roll of thermal paper and check for improvements. Then try to clean the print head as described above.
You can also change the printing density:
- Power off the printer.
- Hold down the [FEED] and the [POWER].
- The ERROR led with shine red, also the BATTERY indicator with shine blue.
- Keep both buttons pressed until the ERROR led turns off and on again.
- Now release both buttons.
- The printer should print “You select Density Level x” where x can be a value between 1 and 4.
- Repeat the procedure to toggle the density level 1->2->3->4->1 and so on.
Reset the printer to its factory defaults
You can reset the printer to its default settings with the help of Config+. You will need:
- Windows computer with latest Config+ installed
- “SPORTident Printer Serial Cable” (Art.-No. 15032)
- A serial port or “SI-RS232-USB-Converter” (Art.-No. 30800) or any other RS232-USB-Converter
- Power on the printer. Be sure to have at least 50 cm of paper inserted into the printer.
- Connect the printer to the computer using the “SPORTident Printer Serial Cable” (Art.-No. 15032). Be sure to use the “COM” jack on the printer.
- Open Config+ on your computer.
- In the “Devices” list, select the proper device with a single left click. If you do not see the desired device, be sure to have View > Show all available devices checked in the menu.
- In the menu, click Commands > SPORTident Printer > Reset printer to factory defaults.
Config+ will guide you through the reset procedure. First it will try to communicate with the printer. Follow the instructions on the screen.
During the reset, the printer should print out the following:
Config+ connection ok
Setting Bluetoothpassword to 5349
Operating OK!!!
Resetting formatting.
Factory data reset is done.Please restart the printer.